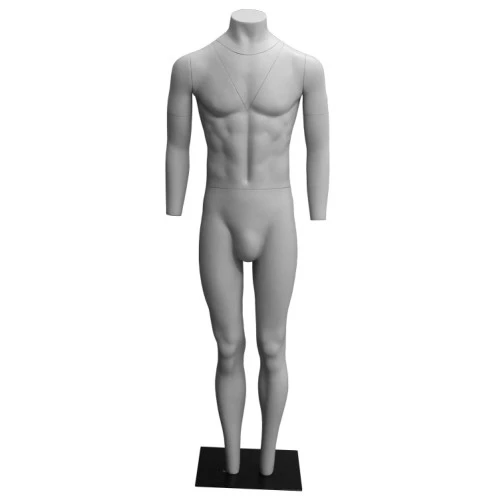
Photographing your garments on a mannequin allows potential customers to see how they might look when worn. The ghost mannequin effect does this without any manmade body parts being visible, removing any distractions and celebrating the form of the item.
Why might you want to create the mannequin effect?
When it comes to photographing your garments for online display or merchandising products, you want them to look their absolute best. Even the most luxurious hangers can’t always create the shape that you want from a dress or shirt. They certainly won’t convey the quality of the item in a picture. You could lay your items out flat, but this removes any sense of movement and shape from the garment. You could also use real-life models, but these are a pricier option.
A ghost mannequin is a wonderful solution. You get the shape of a model in a cost-effective package! You can create the angles you want from your ghost mannequin photography, and you can go back, again and again, to retake pictures if they don’t live up to your expectations. Pay only once for the invisible mannequin and then it is yours to use with as many garments as you like.
How do you do invisible mannequin photography?
You don’t have to be an expert photographer to get great pictures of your garments using a mannequin. If you have been tempted to try, but don’t know how to create a ghost mannequin effect, then here are some top tips to get you started!
- Prepare the area: To get the perfect pictures, you need to make sure you have set the scene. You’ll probably want a plain white background in a well-lit area. Make sure you have everything you need to hand, including all the garments that you want to photograph, as well as the associated invisible ghost mannequin. Unless you are photographing lots of the same type of item, you’ll probably need a selection of mannequins, to show every garment at its best.
- Plan how your garments will sit: When it comes to choosing a mannequin, you’ll want one that best suits your clothing. If your model is a size 10 and you only have size 16 clothes to hand, they will look baggy and messy on the mannequin. And if you have a lot of trousers to photograph but you only have top-half mannequins, you will also struggle. So, make sure you’ve got all the right things for all the right products and keep a selection of clips nearby so that you can tailor the item to better fit the mannequin. Ensure your mannequin is symmetrical and that any arms are pointing down. Steam or iron all clothes prior to the shoot and make sure there is nothing obstructing the items.
- Take the photos: We recommend taking at least three or four pictures of each garment. One picture at the front and one at the back. You can also take pictures of the item on a flat foam sheet, which will help you when it comes to editing. And you should also take some shots inside out, again for editing purposes. Keep the camera at the same height as the garments, so that you photograph it straight on and not at an awkward angle.
Editing your invisible ghost mannequin photography
This is where the magic happens.
Upload your images into photoshop. With really good pictures, you won’t have too much editing to do, but it is definitely not a step you can miss out on.
The first thing you’ll need to do is double-click the background layer so that it can be edited. Place a new layer behind it and fill it in completely black. If your garment is black, change the background to white instead.
With the front layer selected, open the Magic Wand tool, and choose the option to select and mask. This should bring up the picture of your garment on a black background. Find the Select Subject option and click on it. This should provide an almost perfect outline of your garment. You can use the Refine Edge tool to tidy up the edges.
If you have any bis of mannequin showing, you can then choose the Quick Selection tool and click on Subtract. You can then click on the areas of the image that you would like to remove. It is easy to fix any mistakes. Simply click on Undo and reduce the size of the selection tool.
You can then finish off with the basic eraser tool.
Repeat all these steps with your other images of the same garment.
Once you have all your layers, you can put them together to fill any spaces left in the primary image. Use the Rectangular Marquee tool to cut out the bits that you need to add to the original picture. This allows you to show any areas that may have been hidden by the mannequin. You can scale the selected area so that it fits in the required space neatly, making for a picture-perfect finish in your invisible mannequin photography.
If you really want to take your picture to the next level, you can play with the Warp tool, which helps foam flat images to better blend with mannequin photography. You can also add Shadow for a dramatic effect. You can even change the colour of the background if that will better suit your brand.
Are you looking for a female ghost mannequin for sale?
Valentino’s Displays have an incredible range of male and female mannequins, in a variety of sizes from baby and child, to adult. We have mannequins that pose and mannequin parts that are great for isolating items. If you can’t find exactly what you need, let us know! We love a challenge and will help you find the product that you are looking for.